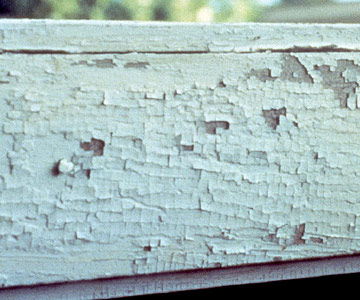
Peeling and Alligatoring
^ Does this look familiar? ^
Well I can tell you exactly how this happened…
Bill walks into the kitchen and found his wife looks through the phone book for a painter. He slams the Yellow Pages shut and says to her…“NO WAY! I will paint the house myself!” Next thing she knows, he is off to Home Depot in search of the cheapest paint and primer money can buy. Bill had every intention of doing the best job possible; after all, he told his wife he could do it himself. But somewhere around 4 hours into the project, Bill decided he has had enough sanding and scrapping! He stands back and looks at his work and says to himself, ‘good enough’. Bill forgot to get caulk for patching while he was at the store so he decides to skip that part and jump straight to the painting. With daylight hours passing fast, Bill races to finish what seems like a never ending project. The result? peeling and alligatoring the very next year!
A good exterior paint job should last you 7-10 years. Preparation before painting is SO important. And when the time is not taken to prep the surface properly, peeling and alligatoring is the result. There is a difference between the two problems but only one way to fix both… DO IT RIGHT THE FIRST TIME!
POSSIBLE CAUSES OF PEELING:
- Seepage of moisture through un-caulked joints
- Excess moisture escaping through the exterior walls (more likely if paint is oil-based).
- Inadequate surface preparation.
- Use of lower quality paint.
- Applying an oil-based paint over a wet surface.
POSSIBLE CAUSES OF ALLIGATORING:
- Application of an extremely hard, rigid coating, over a more flexible coating. (like an alkyd enamel over a latex primer.)
- Application of a top coat before the undercoat is dry.
- Natural aging of oil-based paints as temperatures fluctuate. The constant expansion and contraction results in a loss of paint elasticity.
How to prevent these types of issues from happening to your home:
1.) Power wash the exterior of your home.
2.) Remove all loose paint with scraper or wire brush
3.) Sand the surface smooth.
4.) Prime with a high quality latex or oil-based primer.
5.) Once the primer has dried, identify and caulk problem areas to prevent the moisture from coming back.
6.) After caulk and primer are completely dry, repaint with a top quality acrylic latex exterior paint for best adhesion and water resistance.
7.) Think realistically… Make this a one step project and call Mike’s Decorating & Painting.
For a FREE estimate, Call (815) 469-5577
